# project / sanitized technical case study
HOME SIEM · COWRIE HONEYPOT · SPLUNK · QEMU/KVM
Zombie Lab: a home SIEM with a honeypot, dashboard, and investigation workflow
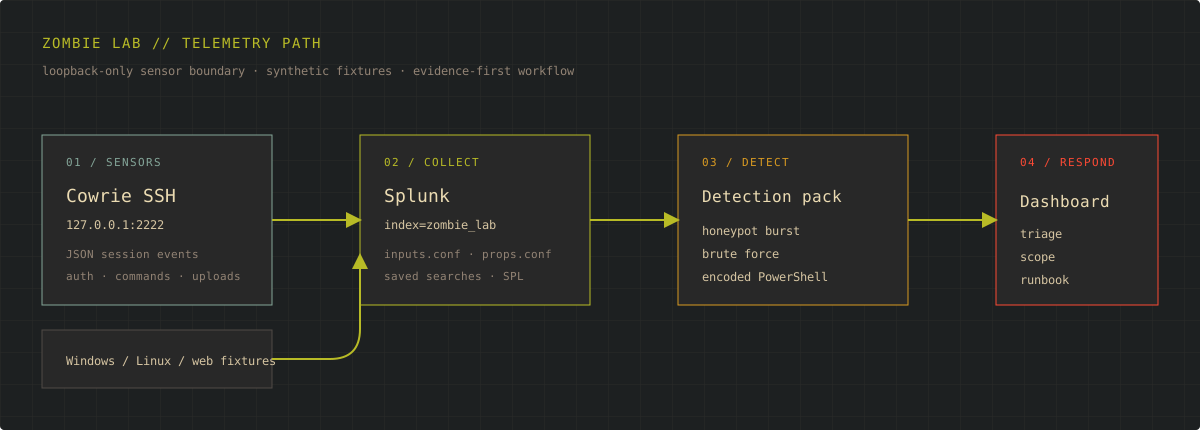
I turned a Windows investigation lab into a small home SOC: Cowrie provides controlled SSH deception, Splunk normalizes the telemetry, detections turn behavior into signals, and a dashboard gives the analyst a fast path from alert to evidence and response.
00 / HOME SIEM
One lab, four telemetry paths, one analyst workflow.
The project now joins the earlier QEMU/KVM Windows investigation with a small SIEM pipeline. The point is not to imitate an enterprise SOC by adding tools indiscriminately. It is to make the core loop visible and repeatable: collect, normalize, detect, investigate, document, and validate.
Loopback-only deception sensor; JSON session, login, and command events.
Synthetic authentication, process-creation, and web events for repeatable tests.
Dedicated `zombie_lab` index with monitored inputs, parsing, and saved searches.
Detection context, pivots, containment decisions, and closeout evidence.
00.1 / DASHBOARD
Make the first minute of triage legible.
The dashboard is designed around analyst questions rather than decorative widgets: what fired, which sensor saw it, which identities or hosts were involved, and where should I pivot next? The preview below uses the project's seeded synthetic events and is intentionally marked as a preview until the live Splunk host evidence is captured.
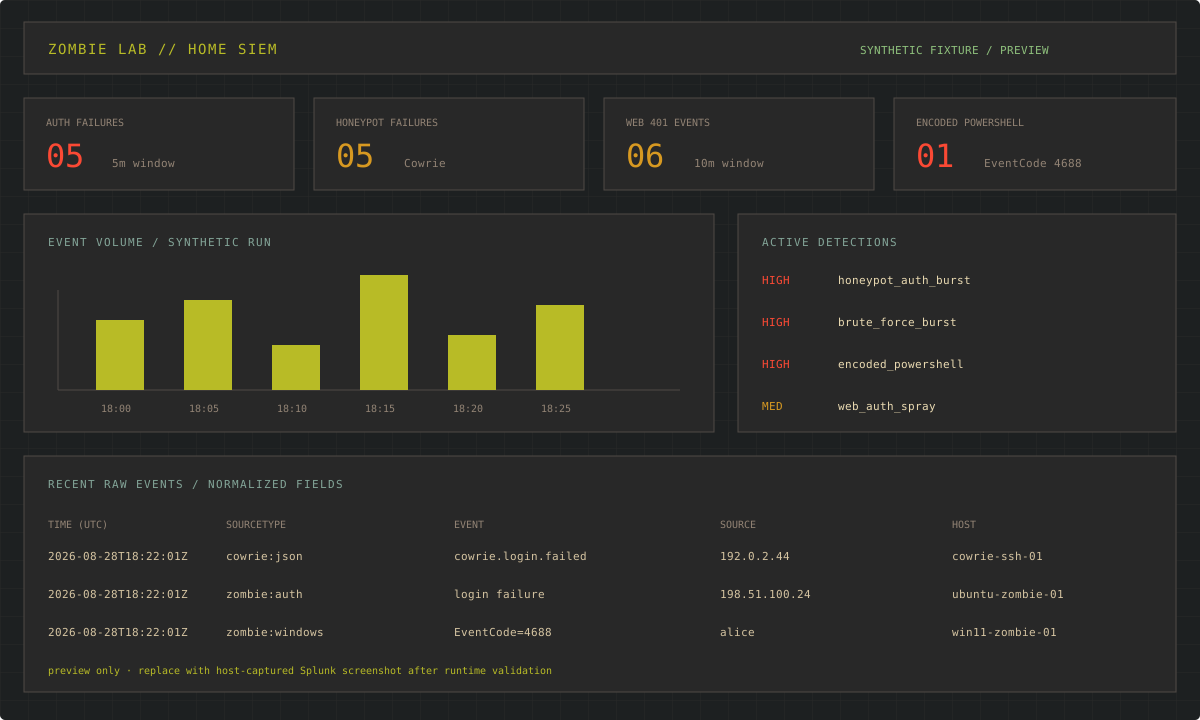
Detection name, severity, event ID, source, and time window remain visible together.
Distinct users, source IPs, sessions, hosts, and related sourcetypes guide the next search.
The analyst can pivot from an aggregate result back to raw events and fields.
The runbook separates validation, containment, remediation, recovery, and closeout.
00.2 / HONEYPOT
Collect hostile behavior without creating a new exposure.
Cowrie is useful here because it records failed authentication, session context, shell interaction, and transferred files in structured logs. In this first iteration, it binds only to 127.0.0.1:2222. That makes the sensor testable from the lab host while keeping the exposure decision explicit and reversible.
No public interface, router port-forward, or production network path.
Session, source, username, event ID, and command fields remain available for Splunk.
Generate known activity with a local test session before any wider exposure decision.
Only after isolation, patching, monitoring, and recovery procedures are proven would broader access be considered.
01 / OBJECTIVE
Establish a trustworthy environment before interpreting evidence.
Mad Hat's Chapter 1 Zombie Lab arrived as an Open Virtualization Appliance designed for VirtualBox. My daily workstation runs Arch Linux with QEMU/KVM and virt-manager. Instead of installing a second hypervisor, I treated platform migration as the first technical problem.
The security exercise could not begin until I knew the guest was running under conditions close enough to the source appliance to make its behavior meaningful. A booting desktop by itself was not sufficient. I wanted a repeatable baseline: an unchanged source artifact, a traceable disk conversion, compatible virtual hardware, multiple clean boots, and a snapshot to which I could return if an investigative action changed system state.
All conversion work occurred against a copy, leaving the supplied appliance available for recovery.
Firmware, disk bus, and boot order reflected what the installed guest expected.
The baseline survived shutdown and restart rather than succeeding once by chance.
The investigation could be repeated without rebuilding the appliance.
02 / ACQUISITION
Preserve first, translate second, investigate third.
An OVA is a packaged collection rather than a magic hypervisor-specific disk. I worked from a duplicate, unpacked the archive, and reviewed the three useful components: the OVF descriptor, the virtual disk, and the manifest. The descriptor documented the source machine's intended hardware; the disk contained the guest; the manifest provided an integrity reference for the original package.
I inspected the source disk before conversion, converted the working copy from VMDK to qcow2, and inspected the result again. The goal was not merely to change the extension. It was to confirm that QEMU recognized the input format, produced the requested output format, and reported a plausible virtual size before I attached the result to a VM.
# Generic sequence — challenge filenames intentionally omitted
tar -xf <appliance-copy>.ova
qemu-img info <source-disk>.vmdk
qemu-img convert -p -f vmdk -O qcow2 \
  <source-disk>.vmdk <working-disk>.qcow2
qemu-img info <working-disk>.qcow2
This separation mattered later. If the imported guest failed, I could distinguish a damaged source, a failed conversion, a virtual hardware mismatch, and an operating-system problem instead of treating every symptom as "the VM is broken."
03 / VIRTUAL MACHINE
Start conservatively and remove unnecessary variables.
I recreated the machine in virt-manager instead of importing assumptions from the VirtualBox definition wholesale. The converted system disk was attached through SATA, a deliberately conservative choice for the first boot. A faster paravirtualized path such as VirtIO can be a later optimization, but it adds a guest-driver dependency that was irrelevant to proving the initial boot path.
QEMU/KVM with virt-manager
Imported training appliance
Converted from a preserved VMDK working copy
Modern virtual platform retained during troubleshooting
Matched the appliance's installed boot mode
Reduced storage-driver uncertainty
04 / BOOT FAILURE
The disk was visible, but the guest still lacked a valid route to Windows.
The first configuration used UEFI. Windows reached a blue screen. In another attempt, the display flashed and returned to firmware without a durable error message. virt-manager could see the disk, so basic attachment was working, but that observation proved only that the hypervisor had a block device—not that the guest firmware could start the installed OS from it.
I separated the boot chain into layers and tested them in order. First: did the converted image exist and report the expected format and capacity? Second: was the virtual disk attached and first in the boot order? Third: did the storage controller require a driver the guest might not have? Fourth: did the firmware mode match how Windows had originally been installed? Only after those layers would it make sense to repair Windows itself.
Readable source and plausible converted image
Disk present on an intentional controller and bus
Boot mode compatible with the installed partition path
Windows startup tested only after the platform path was valid
The decisive variable was firmware. The appliance had been installed for a legacy BIOS path, while my initial VM expected UEFI. Switching to BIOS/SeaBIOS aligned the virtual platform with the existing installation. Keeping the SATA attachment unchanged isolated firmware as the variable that explained the recovery.
“The disk is attached” is not the same claim as “the guest has a valid path from firmware to the operating system.”
05 / BASELINE
A single successful boot is an observation, not a baseline.
After Windows loaded, I verified that the guest reached an interactive desktop, recognized its virtual hardware, shut down cleanly, and booted again with the same configuration. I then created a clean snapshot before interacting with the suspicious state.
That snapshot served two purposes. It protected repeatability, and it separated infrastructure troubleshooting from security analysis. If later behavior changed because I terminated a process, altered persistence, or removed an artifact, I could return to the known starting point rather than wonder whether the migration itself had changed the exercise.
06 / INVESTIGATION
Start with the user-visible symptom and preserve the chain of evidence.
The Windows investigation began with an ordinary-looking problem: a file could not be deleted because it was in use. That message did not identify intent, severity, or persistence. It was simply the first reliable observable. Rather than forcing deletion, I used the lock to pivot toward the process that owned the open handle.
- 01Reproduce and record the symptom.
I confirmed that the file remained locked and recorded its location and state before changing anything. Reproduction prevents a transient UI condition from becoming the foundation of the investigation.
- 02Resolve the handle to an owner.
A Windows handle-inspection view linked the locked object to its owning process and PID. The exact file and process identifiers are intentionally withheld; the important step was converting a vague symptom into a specific execution context.
- 03Inspect context before containment.
I reviewed the process relationship, executable location, and surrounding activity before terminating it. In a production case I would additionally preserve command line, user, parent PID, start time, signature status, hash, and relevant event or EDR telemetry.
- 04Correlate the PID with network activity.
Connection evidence tied recurring outbound behavior to the same process context. The endpoint and timing details are withheld, but the correlation showed that the process was doing more than holding a local file open.
- 05Use termination as a controlled test.
Stopping the process released the handle and allowed the file operation to proceed. That confirmed causality between the process and the symptom, but it did not prove the system was remediated.
- 06Reboot and look for recurrence.
After restart, the behavior returned. Recurrence transformed the working question from “what owns this file?” into “what launches this process after startup?”
- 07Trace persistence to its launch mechanism.
Scheduled-task review connected the recurring process to a persistence entry. I examined the task's trigger, action, execution context, and target relationship rather than judging it from its display name alone.
07 / HYPOTHESES
Each action answered a narrower question.
I treated the exercise as a sequence of falsifiable hypotheses. This kept each action tied to a reason and prevented the investigation from becoming a tour of Windows utilities.
Is the lock reproducible?
Repeat the file action before intervention.
Establishes a stable starting observable.
Does one process own the symptom?
Map the open handle to a PID.
Creates a defensible file-to-process link.
Is the process externally active?
Correlate PID and recurring connections.
Extends scope beyond a local file lock.
Is stopping it sufficient?
Terminate, retest, then restart.
Separates temporary containment from durability.
What explains the return?
Inspect launch points and task properties.
Identifies the persistence mechanism.
08 / RESPONSE
Containment changed the moment. Remediation changed the next boot.
Terminating the process stopped its immediate activity and released the locked resource. That was useful containment and a strong diagnostic test, but the reboot proved it was temporary. The scheduled launch mechanism remained capable of recreating the same operating condition.
Remediation required breaking that launch path, addressing the associated artifact, and then repeating the tests that had originally exposed the behavior. The order mattered: preserve what is needed for analysis, contain active behavior, remove persistence, address the payload or artifact, and validate from a fresh boot.
Killing a process is containment. Removing persistence is remediation. Scoping access and impact is incident resolution.
Release the handle and interrupt the observed activity.
Remove the demonstrated persistence and address its associated artifact.
Reboot, repeat the original checks, and look for recurrence.
In production, determine spread, access, data exposure, and related identities or hosts.
09 / VALIDATION
Return to every observable that supported the finding.
Validation was not “the suspicious window is gone.” I returned to the same evidence chain and checked each link after remediation. The file operation no longer failed, the associated process context was absent, the recurring connection pattern did not return, the persistence entry no longer launched the behavior, and a reboot did not recreate the condition.
File handle
Present
Released
Absent
Associated process
Running
Stopped
Did not return
Recurring connection
Observed
Interrupted
Not observed
Persistence path
Active
Still present
Addressed
Post-reboot behavior
Recurred
Would recur
Clean
10 / ATT&CK MAPPING
Map what the evidence demonstrates—no more.
The scheduled-task behavior directly supports MITRE ATT&CK technique T1053.005 — Scheduled Task/Job: Scheduled Task. The task supplied the repeatable launch mechanism that explained why terminating the process did not survive a reboot.
I deliberately avoided padding the case study with techniques that merely sounded plausible. A network connection does not, by itself, prove command-and-control. A suspicious process does not automatically prove process injection. Technique mapping is useful only when the collected behavior supports it; otherwise it turns a framework into decoration.
11 / PRODUCTION TRANSLATION
A real endpoint would require broader evidence and coordinated response.
This was a controlled training system, so the exercise could focus on one host and a known evidence chain. On a production endpoint, I would preserve more context before changing state and expand the investigation beyond the first machine.
- Preserve volatile context.Capture process tree, command line, logged-on identity, hashes, network connections, relevant memory or EDR telemetry, and timestamps before termination when risk allows.
- Establish prevalence.Search EDR, SIEM, DNS, proxy, firewall, and identity logs for the same hashes, paths, task characteristics, destinations, or user activity across the environment.
- Contain at the right layer.Isolate the host or block an indicator when warranted; do not assume process termination alone controls the incident.
- Protect evidence.Retain the suspicious file and relevant telemetry according to incident-handling requirements before destructive removal.
- Scope impact.Determine initial access, privilege level, lateral movement, credential exposure, data access, and whether other persistence mechanisms exist.
- Define exit criteria.Require a clean reboot, absent persistence, no recurring telemetry, successful control checks, and documented monitoring before closure.
12 / LESSONS
What transfers to real security engineering work.
- Symptoms are starting points.A locked file became useful only after it was correlated with handle, process, network, and persistence evidence.
- Presence is not validation.A visible disk, installed agent, configured log source, or closed alert may still lack a functioning operational path.
- Reboots are investigative tools.Restart testing exposed the difference between stopping execution and removing the mechanism that recreated it.
- One-variable changes preserve causality.Keeping the storage path constant while changing firmware made the boot conclusion defensible.
- Evidence should constrain language.The write-up distinguishes what was observed, what was inferred, and what would require additional telemetry.
- Documentation makes work reusable.A repeatable method is more valuable than remembering the correct click sequence for one lab.
13 / DISCLOSURE
Technical depth without publishing the answer key.
The public version keeps the migration process, diagnostic logic, evidence relationships, response model, validation criteria, and ATT&CK reasoning. It removes the values a learner would otherwise be expected to discover: exact object names, identifiers, paths, endpoints, task details, credentials, flags, and question responses.
That boundary lets me demonstrate the work while preserving the lab for the next person. If there is interest, I am happy to record a sanitized video walkthrough focused on the QEMU/KVM migration and investigative methodology—still without revealing challenge answers.
14 / MILESTONE
Document the work, not just the score.
Completing and documenting the lab moved me to #30 on Mad Hat's global leaderboard, among more than 4,300 displayed users at the time—approximately the top one percent. The ranking is a useful milestone; the durable result is a migration and investigation method I can explain, defend, repeat, and adapt elsewhere.
15 / SOURCES
Build from primary documentation, then show your own evidence.
The implementation follows the upstream configuration model for each component. These links are here so a reviewer can verify the design, while the project files and screenshots show how I applied the guidance in a controlled lab.